My journey to creating homemade shampoo involved a lot of trial and error. There were countless mixtures of liquid castile soap, coconut milk, essential oils, and the occasional splash of olive oil – all of which left my scalp and hair a confused mix of dry, oily, and limp.
Eventually I created this pure coconut oil shampoo bar, which worked beautifully for many years.
Until it didn’t.
Over the past year or so, my scalp started changing in ways I didn’t expect. Hormonal shifts during perimenopause can make the scalp more reactive and sensitive, and almost overnight my old routine – which I had used for many years without issue – suddenly started making my scalp itch.
Nothing seemed to help – not my shampoo bar, not the non-toxic, professionally formulated shampoos I tried, and not changing how frequently I washed.
So I started experimenting again.
That eventually led me to the Ayurvedic hair mask recipes I shared recently → you can find them here.
They soothed my scalp and left my hair feeling soft and light, but they also had a couple of drawbacks: they could be a little messy to apply (and sometimes left me rinsing the shower afterward), and they took a bit of time to wash out completely. If I rushed it, I’d sometimes find a little dried mask in my hair later.
So I began experimenting with a simplified version that could be used more like shampoo.
The result is the recipe below.
It takes a little preparation, but it’s still very simple overall and rinses out easily, with no extra cleanup needed.
Sometimes when I share a recipe, like this gluten-free “cornbread,” I’ll get a few comments saying “but that doesn’t have any corn in it!” And it’s true.
I love corn, but it doesn’t love me back, so I developed the recipe to get as close to the taste and texture of cornbread as possible without actually using corn. That’s what the quotation marks are for: it’s cornbread-ish, but not technically cornbread.
So . . . is this really shampoo?
Oddly enough, yes.
In fact, some variation of this recipe is very close to the original shampoo.
The earliest forms of shampoo were likely developed in ancient India – sometime during the Indus Valley Civilization – by boiling herbs such as soapberries (reetha), shikakai – which literally translates to “fruit for hair” – and Indian gooseberry (amla), all ingredients that appear in this recipe.
The word shampoo itself comes from the Hindi word chāmpo, meaning “to massage” or “to press.” British traders encountered the practice of hair washing and scalp massage in India and eventually brought “champing” to Europe in the 1700s.
This recipe doesn’t have the thick, goopy texture of commercial shampoo – some people even describe it as a “hair tea.”
However, the herbs in this blend are well known for helping to cleanse, moisturize, and volumize hair.
Several contain saponins, which are natural plant compounds that act as mild surfactants – gently lifting away dirt and oil. That’s why this recipe creates suds – but not the dramatic foam that commercial detergents produce.
So while it may feel unusual compared with modern shampoo and doesn’t lather the way most of us are used to, it actually resembles the original versions much more closely.
And in my experience, it cleans hair just as well – better, in fact. My hair feels light, soft, and shiny, without the buildup that many modern shampoos can leave behind.
And unlike some DIY shampoo formulas, this recipe is completely beginner-friendly.
No complicated formulation.
No soapmaking skills required.
Just herbs, hot water, and something to strain with.
Amla and shikakai have traditionally been used as natural pigment enhancers, meaning they may gradually deepen hair color over time.
I naturally have very dark hair and haven’t noticed any change in color.
However, if you have lighter hair (and want to keep it that way), you may want to:
One thing to keep in mind, though, is that reetha contains more natural saponins than shikakai and provides stronger cleansing, so too much can feel slightly drying.
Everyone’s hair is a little different, so think of this recipe as a starting point rather than a rigid formula.
It’s what works best for my hair after a lot of trial and error, but you should feel completely free to adjust it based on what your hair needs.
If your hair tends to feel dry, try adding a little more aloe or amla. If it leans oily, you can increase the reetha slightly.
A little experimenting goes a long way, so feel free to play with the ratios and see what your hair loves most.
Here’s a quick look at what each ingredient brings to the recipe.
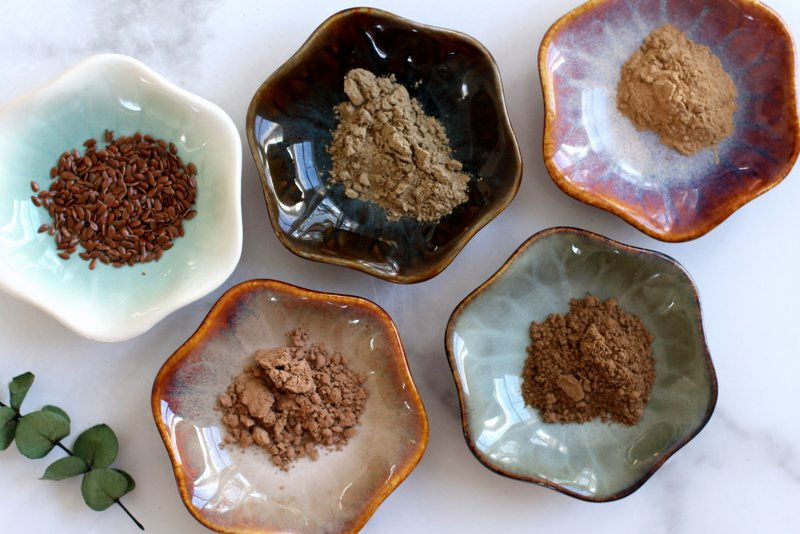
Shikakai Powder
Shikakai (Acacia concinna) has been used in Ayurvedic hair care for centuries as a gentle cleanser and conditioner. It contains natural saponins that help remove light buildup without stripping the scalp’s natural oils, and may help create the conditions that allow your natural hair growth cycle to function more optimally.
Many people find it leaves hair soft, smooth, and easy to detangle. It’s also a traditional Ayurvedic remedy for dandruff. One important note: avoid getting shikakai in your eyes, as it can be very irritating.
Reetha (Soapnuts)
Also called soapberry or soapnut, reetha is one of nature’s richest sources of saponins. In traditional hair care it’s often paired with shikakai to balance cleansing with conditioning.
Flax Seeds or Fenugreek Seeds
These seeds release a natural gel when steeped in hot water. That gel adds slip and conditioning to the shampoo, making it easier to spread through the hair. I prefer flax seeds in this recipe, but fenugreek also has a long history in Ayurvedic hair care for supporting scalp health and helping hair feel stronger.
Aloe Vera Powder
Aloe adds hydration and conditioning while helping soothe irritated scalps. It can also add a little shine and smoothness to the hair.
Amla Powder
Amla (Indian gooseberry) is rich in antioxidants and is traditionally used in Ayurvedic hair care to support scalp health and enhance shine.
You can make this shampoo two different ways depending on how strong or thick you want it to be.
Method 1 is the simplest version. It uses boiling water to extract the beneficial compounds from the herbs and works well for most people.
Method 2 simmers the herbs on the stovetop, which pulls out more of the natural saponins and the moisturizing gel-like compounds released by the seeds. The result is a slightly thicker, more “activated” shampoo that some people find provides a little more cleansing or conditioning power.
Here’s how to make your own shampoo with Ayurvedic herbs and hot water.
Prep Time 5 minutes
Cook Time 20 minutes
Cooling time 30 minutes
Total Time 55 minutes
Servings 1 batch
Calories
Author Heather Dessinger, FDN-P
nut milk bag (or mesh strainer lined with cheesecloth)
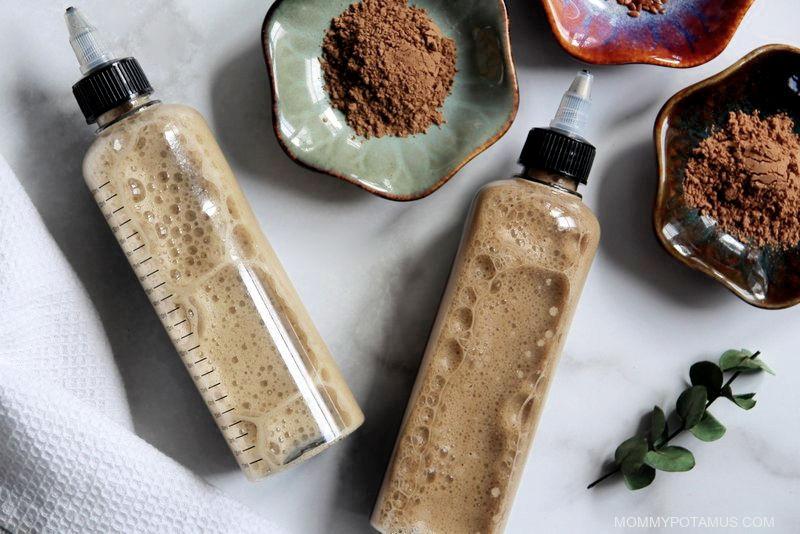
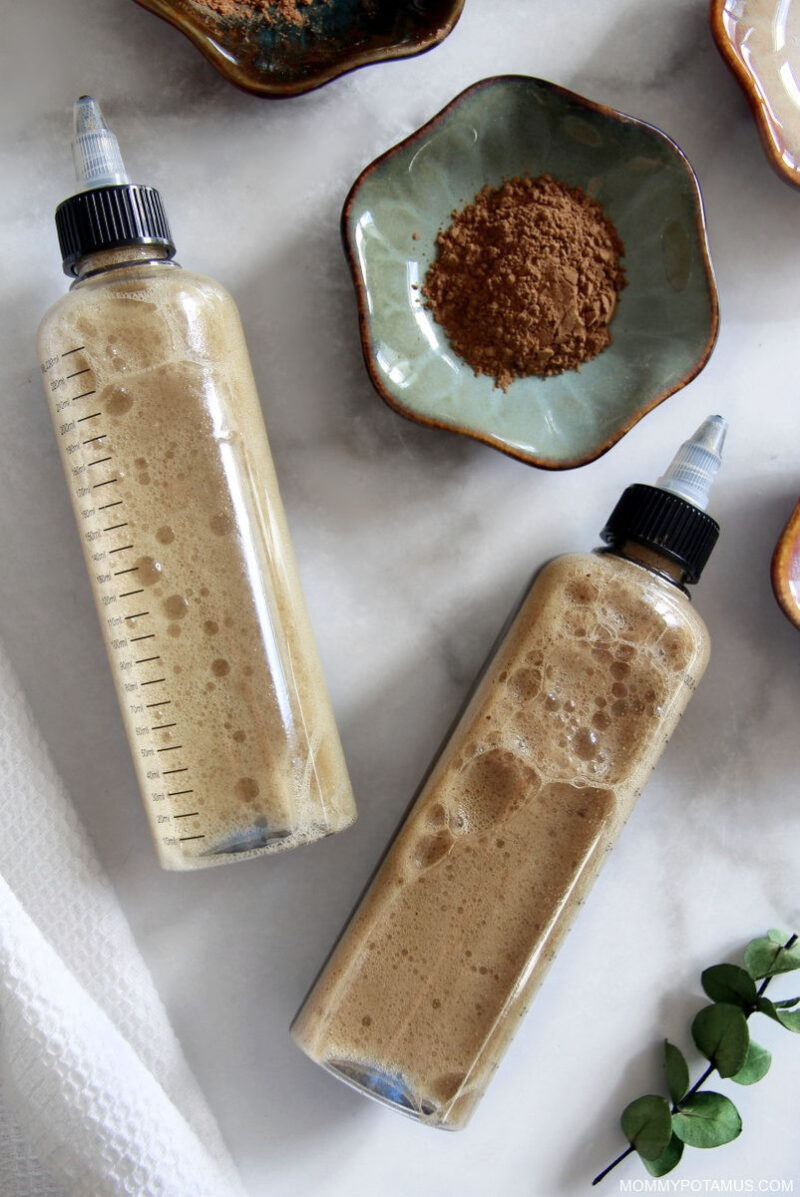
Line a mason jar or measuring cup with a nut milk bag. If you don’t have one, you can use a mesh strainer and cheesecloth to strain it after infusion.
Place the shikakai powder, reetha powder, and flax seeds inside the nut milk bag.
Bring 1¼ cups water to a boil, then pour it over the herbs and stir to combine.
Allow the mixture to cool for about 20 minutes, then stir in the aloe vera powder and amla powder if using.
Let the mixture infuse for another 10 minutes.
Strain through the nut milk bag. If you don’t have one, you can also strain by pouring the mixture over bowl that contains a mesh strainer lined with cheesecloth.
Once it has fully cooled, your shampoo is ready to use.
Place the shikakai powder, reetha powder, and flax seeds in medium pot. Add 1.5 cups water and stir to combine.
Bring mixture to a boil, then reduce heat and simmer for 20 minutes.
While the mixture is simmering, line a mason jar or measuring cup with a nut milk bag. If you don’t have one, you can use a mesh strainer and cheesecloth to strain it after infusion.
Remove the mixture from heat and pour it into the nut milk bag, using a spoon transfer any herbs that have settled at the bottom. If you don’t have a nut milk bag, you can pour the mixture into a mason jar.
Allow the mixture to cool for about 20 minutes, then stir in the aloe vera powder and amla powder if using.
Let the mixture infuse for another 10 minutes.
Strain through the nut milk bag. The mixture becomes thicker as it cools, so I recommend straining while it’s warm yet comfortable to touch. If you don’t have a nut milk bag, you can also strain by pouring the mixture over bowl that contains a mesh strainer lined with cheesecloth.
Your shampoo is ready to use.
Some people apply variations of this recipe to dry hair. Personally, I prefer to wet my hair first, then wring it out until it’s damp.
I shake the bottle a little, then apply about 3/4 of the shampoo to my scalp and roots – focusing mostly on the scalp. After application, I massage gently and let it sit for a few minutes. I have found that an application bottle (like this one made with PET plastic) helps distribute the shampoo more evenly, but you can use a measuring cup or something similar if you’d like.
Then I rinse while continuing to massage my scalp.
After that, I add some water to the remaining shampoo in the bottle and shake it to get a lot of suds going. I apply that all over my scalp and hair, let it sit for a couple minutes, and then rinse.
I typically use this recipe 1-3 times per week.
Generally yes, although you may need to adjust the ratios.
For example, if your hair tends to be dry, adding aloe or amla can help increase conditioning.
If your hair tends to be oily, slightly increasing the reetha may help.
One thing to keep in mind: if you currently use products that coat the hair with silicones or dimethicone, your hair may go through a short transition period while that buildup gradually washes away.
This recipe doesn’t contain preservatives, so I usually make it fresh.
However, once you’ve confirmed the recipe works well for your hair, you can freeze small batches and thaw them as needed.
Not necessarily.
Unlike shampoo bars, which are alkaline and often require an acidic rinse to rebalance hair pH, this recipe is already within a hair-friendly pH range.
That said, some people enjoy following shikakai-based cleansers with a diluted ACV rinse. If that’s something you already like, feel free to experiment.
I don’t usually, but I do use the herbs above – plus a few more – in different ratios to whip up a moisturizing hair mask every week or two as needed.
In the summer, when I spend a lot of time in the sun/saltwater at my local beach, my ends will get a little dry. When that happens, I apply the shampoo recipe above and then dip my ends in a little coconut milk (guar gum-free) while I’m letting it sit. That adds a little moisture without weighing my hair down. This leave-in conditioner recipe also works really well for dry ends.
Do you want to give gorgeous, handcrafted gifts for family and friends, without spending a bunch of time on them?
Then I’d love to give you a free copy of DIY Body Care Gifts Made Simple – my step-by-step guide to making gorgeous handcrafted gifts without stressing yourself out – as a gift for signing up for my newsletter. I’ll show you how to make vintage labels, luxurious lotion bars, lip balms, sugar scrubs, body sprays and more like a pro. Sign up for my newsletter and you’ll be redirected to the download page immediately!
Hair Gel – Tame flyaway frizz, keep curls in check, or style short hair with a non-toxic version of your favorite store-bought stuff. Many of the styling gels on store shelves contain hormone disrupting fragrances and formaldehyde releasers, but you can make natural hair gel with just 1-3 simple ingredients.
Body Wash – The rich, bubbly lather of this homemade body wash recipe cleanses while moisturizing. You probably have everything you need to make it in your pantry right now.
Bakuchiol Skincare Serum – If you’re looking for a gentle, effective way to support skin elasticity and firmness, even out skin tone and protect your skin barrier, bakuchiol is a bioactive compound worth getting excited about. Often called a natural alternative to retinol, it works with your skin’s natural regenerative processes to create change over time.