Did you know that that you can grow nutrient-dense, fresh sprouts on your kitchen counter without any special equipment? It’s totally easy, and it can save you money, too.
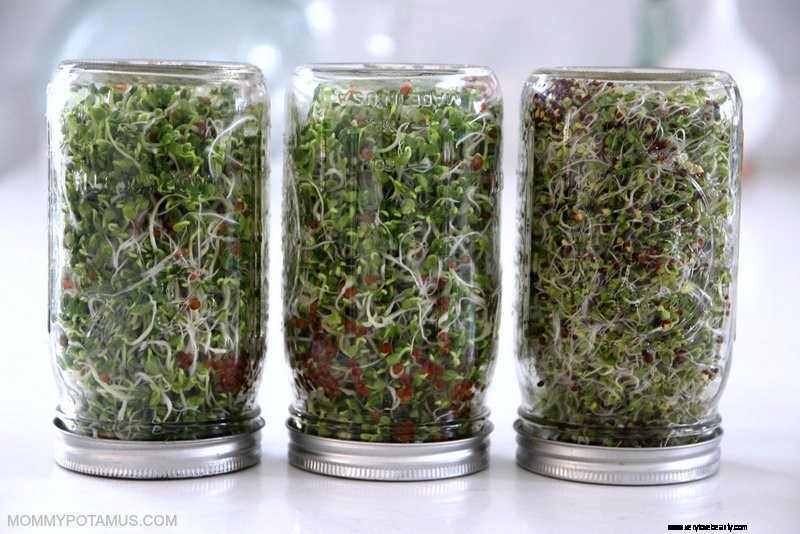
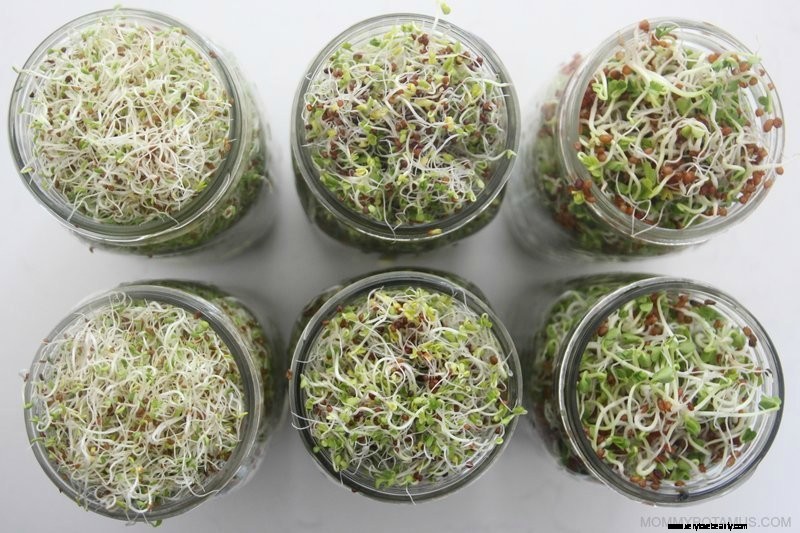
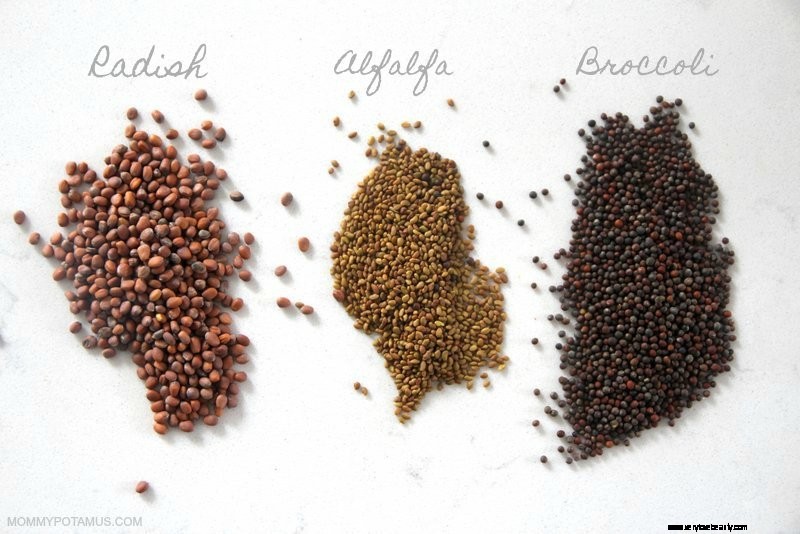
Saving money on groceries without compromising nutrition is a big priority in my house right now, so I’m growing alfalfa (mild flavor), daikon radish (spicy) and broccoli sprouts (a rich source of a potent antioxidant called sulforaphane).
As seeds and legumes begin to grow they become a rich source of vitamin C and other nutrients. In fact, in the 1770’s Captain James Cook grew them on long voyages to prevent his sailors from getting scurvy. (1)
Now, if you sprouted a bean in kindergarten, you know that the key is to keep seeds (or legumes) moist as they begin to grow into tiny, plants. In this article I’ll share my method for doing just that, plus several tips to make the process easier.
If you’re just starting out, a simple setup with a mason jar will work. Here’s what you’ll need:
I have a couple of pre-made sprouting lids, but I also have some DIY ones that I’m using right now. Here are a few ways to make them:
DIY Fabric Sprouting Jar – Place a piece of cheesecloth or pantyhose over the mouth of the jar and secure with a rubber band. Make sure that the material is thin and breathable so that it allows for sufficient air circulation. To use this method you’ll also need a fine mesh sieve.
DIY Mesh Sprouting Jar – Any kind of food-grade mesh will work. I cut an extra screen from my dehydrator into small rounds that fit inside my canning ring. The holes are bigger than the pre-made option so I used two layers per jar. It works well for radish and broccoli seeds. Alfalfa seeds are smaller so a few slipped through on the first day, but after they started growing it wasn’t an issue.
Other Sprouting Equipment Options: If it turns out you love growing sprouts and want to try a different setup, here’s a stackable sprouting tray that has good reviews.
Although technically you could try sprouting fenugreek seeds, mung beans, or lentils from the grocery store, I highly recommend buying seeds that are specifically designated for sprouting. Here’s why:
Places like True Leaf Market carry a huge variety of seed options. The process is the same for all of them, but with slightly different timeframes and amounts. Later in this article I’ve put together a guide to some of the most popular seeds worth considering, including:
We’ll dive into the basic process for sprouting in just a moment, but first you might be wondering . . . .
Although they can be eaten plain, here are some tastier ways to use them:
Below is everything you need to know in order to start growing sprouts at home. It’s super simple once you understand the basics (and super delicious once you start eating your sprouts!)
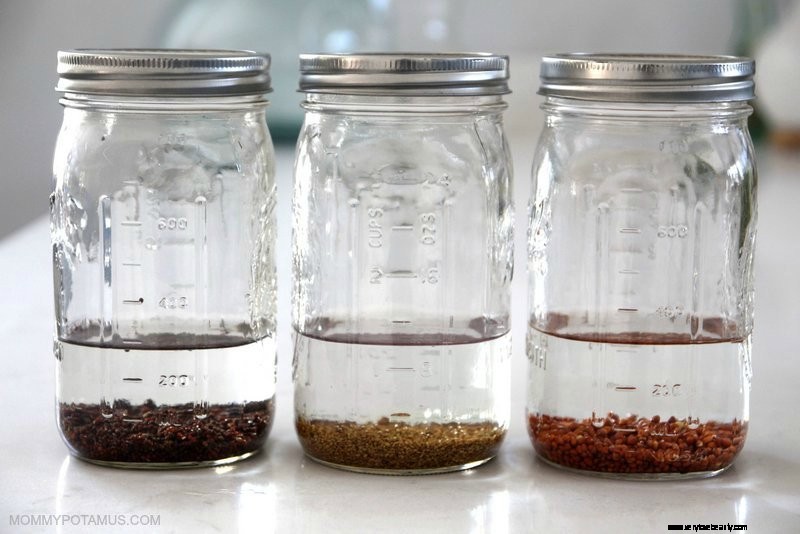
Place your seeds in a clean, 1 quart jar. Typically you’ll use 2-3 tablespoons, but that can vary depending on the type of seed. I’ve included seed specific suggestions at the bottom of this post.
Pour about 1.5 – 2 cups of non-chlorinated water* into the jar and swirl everything with a clean spoon. Place the sprouting screen/ cloth screen on the jar and pour out the water. Now that you’ve rinsed them, fill the jar with cool water. The seeds will absorb some of it as they soak, so use 2-3 times more water than the volume of your seeds. You can use more if you want, it won’t affect the process.
Let the seeds soak for the number of hours recommended. I’ve included a list of specific recommendations for each seed later in this article.
After your seeds have soaked for the designated number of hours, it’s time to drain them.
If you’re using a mesh screen lid: Just tip the jar over the sink to pour it out through the lid. Shake out as much water as you can over the sink, then go to step 3.
If you’re using a cloth mesh top: Remove the cloth from the top and cover the top of the jar with a mesh sieve. Pour the water through the sieve into the sink. Shake out as much water as you can, then go to step 3.
If you’re using a mesh screen lid: Two to three times per day you’ll want to pour fresh, cool water through the screen, swirl it around, and then just tip the jar over the sink to pour it out through the lid. A high pressure stream helps to aerate the seeds and keep them loose.
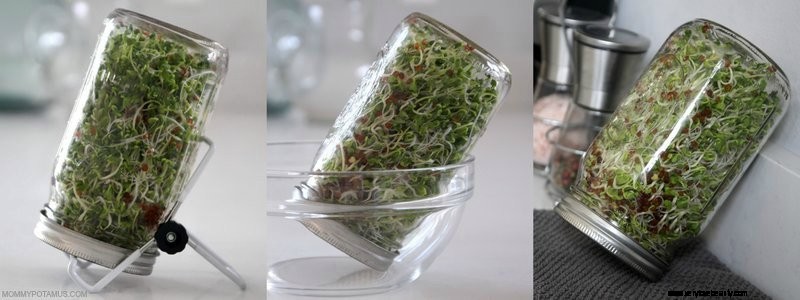
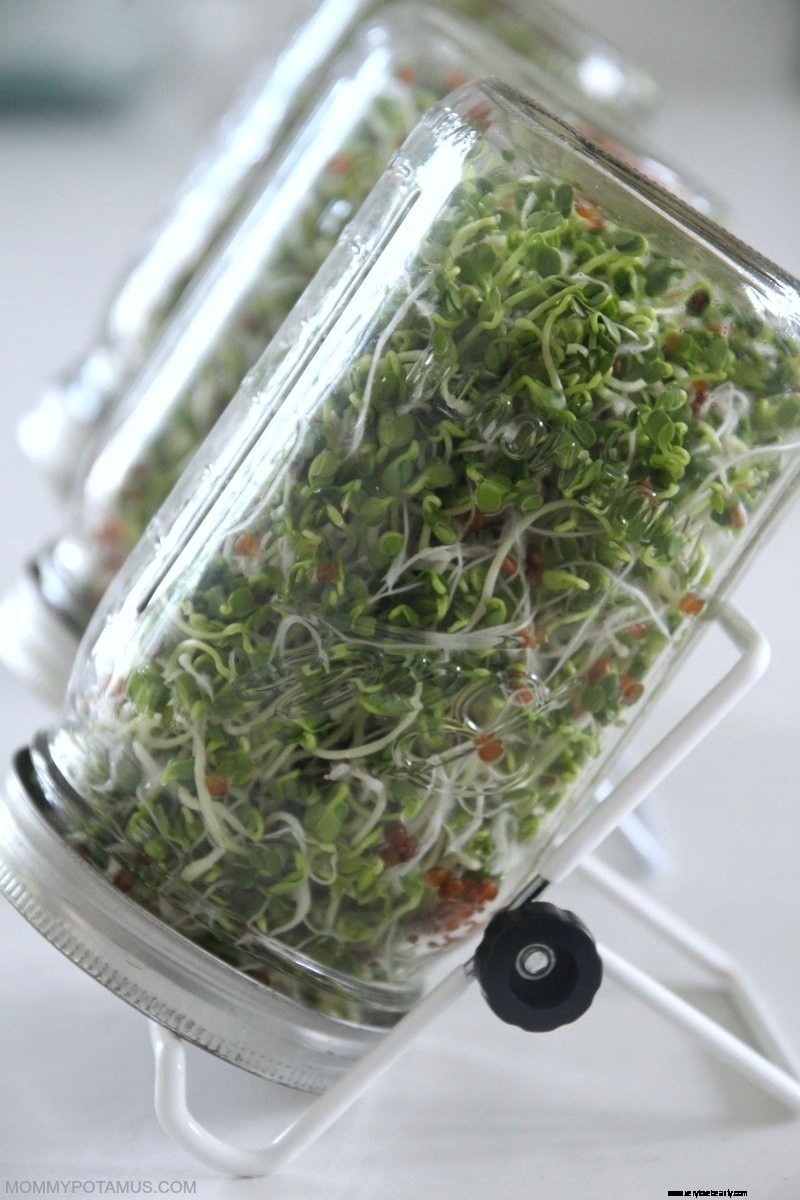
Shake out as much water as you can over the sink, then turn the jar on its side and shake it a little to spread out the seeds a bit. Prop the jar at a tilted angle with the lid side down so that water can continue to drain while maintaining airflow. You can use a sprouting stand, place the jar in a bowl, or lean it against a wall with a towel underneath as shown above
If you’re using a cloth mesh top: Remove the cloth from the top and pour in fresh, cool water. Swirl it around, then cover the top of the jar with a mesh sieve and pour the water back into the sink.
Shake out as much water as you can, then turn the jar on its side and shake it a little to spread out the seeds a bit. Prop the jar at a tilted angle with the lid side down so that water can continue to drain while maintaining airflow. You can use a sprouting stand, place the jar in a bowl, or lean it against a wall with a towel underneath as shown above.
Both mesh screen and cloth mesh: Continue rinsing 2-3 times per day until it’s time to harvest. Estimated harvest times for different seeds are listed later in this article.
Some older sprouting guides say that seeds should grow in darkness for the first few days. They typically recommend placing them in a cabinet, but storing them in an area with stagnant airflow may cause spoilage, and indirect light won’t negatively impact growth at all.
For that reason, I keep my sprouts in a spot on my kitchen counter that gets indirect sunlight. Direct sunlight is too much because the jar amplifies heat/sunlight and can overheat the seeds. For most that’s all that’s needed, but for a few – alfalfa, broccoli, and red clover, for example – you can add a step called “greening.”
Basically, on the third day of sprouting you put them in a well-lit area (not direct sunlight) to stimulate photosynthesis. For me this just means moving them closer to my kitchen windows. It’s totally optional, but I like to do it because I like green sprouts.
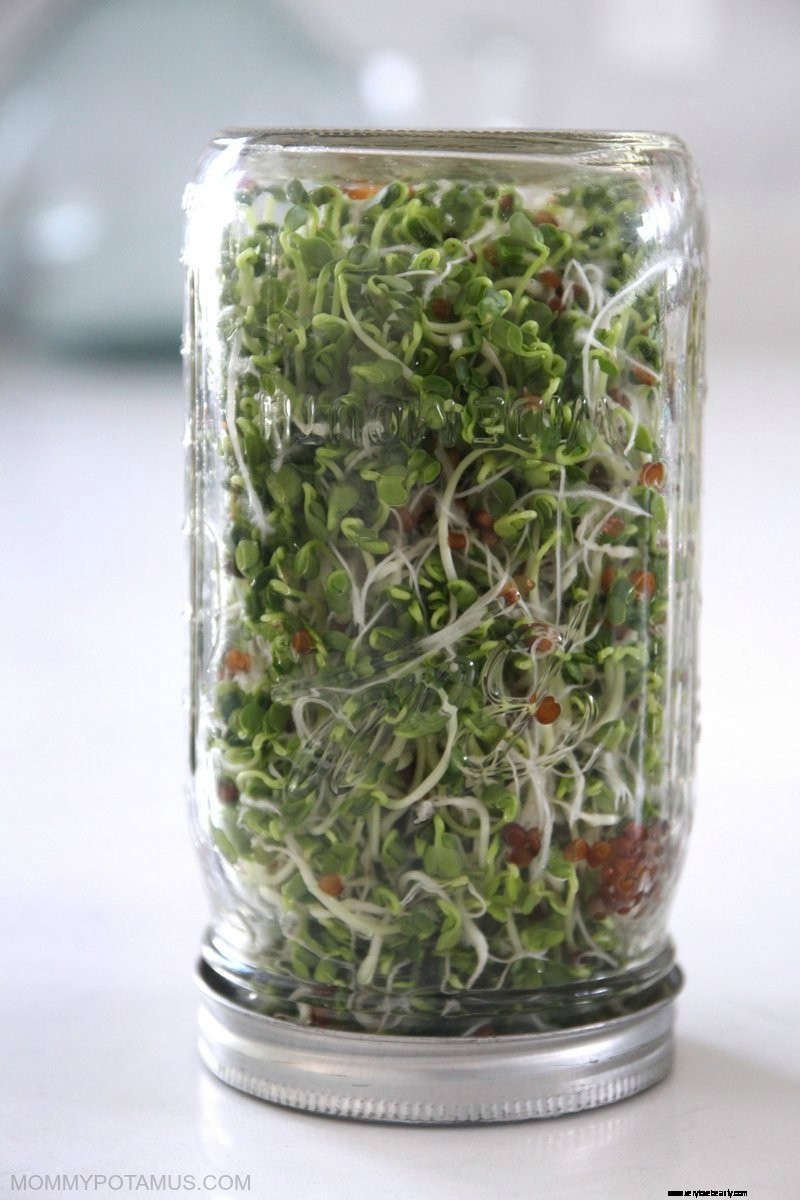
Some people say sprouts are ready when the tails are 1/4 – 1 inch long, or when they’ve grown their first pair of leaves. Personally, I don’t measure tails or count leaves – I just harvest when they’ve grown to the point that they’ve almost taken over the jar.
When your sprouts are ready, you have the option to de-hull them or not. De-hulling basically just means separating the shell of the seed (hull) from the sprouts. There are two ways to do this:
Whether or not you choose to de-hull, it’s important to allow the sprouts to fully dry before storing them. Spread them into a thin layer on a clean, absorbent kitchen towel until they are dry to the touch. This can take 1-8 hours or more depending on how wet they were to begin with.
Now that your sprouts are dry, you can either eat or store them. To store, line an airtight storage container with a small towel or paper towel and place them inside. Your sprouts are now ready to be tossed into smoothies, added to stir fry’s, tossed into salads, etc.
Shelf Life: Sprouts stay good for 5 days – 2 weeks (or longer) depending on the type of seed and how well they are stored. Just like with any food, your nose is a very helpful guide in knowing whether something has gone bad or not.
Use Clean Jars & Tools: Just like it’s important to use clean seeds that are intended for sprouting, it’s important to use clean tools as well. I’m doing a lot of sprouting and fermenting at home right now (hello homemade coconut yogurt and ginger ale!), so I just run everything through my dishwasher with hot water and wash my hands before getting started.
Draining: Excess water is the most common cause of crop failure, so make sure to set your jar at a 45 degree angle so it can drain fully.
Air Circulation: Sprouts need to breathe, so air circulation is your friend while sprouting. After I rinse my sprouts I roll and shake my jar a bit to fluff the sprouts a little while they drain.
If You Need To Skip A Rinsing Session: If you’re going to be away from home and can’t rinse your sprouts, place them in the fridge until you return home.
Seed Storage: If you’re not going to use all your seeds right away, you can extend their viability by storing them in the freezer. Many will last up to five years.
Some seeds are great for beginners and some are a little more temperamental. Below are guidelines for some of the most popular seeds, including soaking times and days to maturity.
Alfalfa sprout seeds are very popular due to their mild flavor and quick sprouting time days. They’re rich in Vitamins B, C, and K, folate, and fiber, and can be used in wraps, salads, sandwiches, soups, smoothies and more.
| Flavor: Mild |
| Difficulty: Easy |
| Seed Amount: 3 tablespoons in 1 quart mason jar |
| Soaking Time: 4 – 6 hours |
| Yield: 3 – 4 cups |
| Rinse: 2 -3 times per day |
| Greening: Move to well-lit area on day 3 if desired |
| Ready: In 2-5 days depending on preference |
| Seed Viability: Approx. 4 years in optimal conditions (70˚F with 70% humidity or less) |
Find organic alfalfa sprout seeds here
Due to their health benefits, broccoli sprouts deserve their own post (which is coming soon). They’re rich in a potent antioxidant called sulfurophane, plus vitamins B, C, and K, folate, and fiber. They’re often used in wraps, sandwiches, salads, and soups.
| Flavor: Distinct | |
| Difficulty: Easy | |
| Seed Amount: 3 tablespoons in 1 quart mason jar | |
| Yield: 3 – 4 cups | |
| Soak: 4 – 6 hours | |
| Rinse: 2 – 3 times per day | |
| Greening: Move to well-lit area on day 3 if desired | |
| Ready: In 3 – 7 days | |
| Seed Viability: Approx. 5 years in optimal conditions (70˚F with 70% humidity or less) |
Find organic broccoli sprouting seeds here
Rich in vitamins B, C, and K, folic acid, and fiber, sprouted chickpeas can be used in place of cooked to make hummus.
| Flavor: Nutty | |
| Difficulty: Intermediate | |
| Seed Amount: 1/2 – 3/4 cup in 1 quart mason jar | |
| Yield: 3 – 4 cups | |
| Soak: 4 – 8 hours | |
| Rinse: 2 – 3 times per day | |
| Greening: Move to a well-lit area on day 3 if desired | |
| Ready: In 3 – 5 days | |
| Seed Viability: Approx. 5 years in optimal conditions (70F with 70% humidity or less) |
Find organic chickpea sprouting seeds here
Mild and slightly sweet, red clover is somewhat similar to alfalfa. It works well in wraps, sandwiches, salads and soups.
| Flavor: Mild |
| Difficulty: Easy |
| Seed Amount: 3 tablespoons in 1 quart mason jar |
| Yield: 3 – 4 cups |
| Soak: 4 hours |
| Rinse: 2 – 3 times per day |
| Greening: Move to a well-lit area on day 3 if desired |
| Ready: In 5 – 7 days |
| Seed Viability: Approx. 4 years in optimal conditions (70˚F with 70% humidity or less) |
Find organic red clover sprouting seeds here
While tea made from fenugreek seeds is slightly sweet with a licorice flavor, sprouted fenugreek is bitter and exotic in flavor. Rich in vitamins B, C, and K, folic acid, and fiber, it’s best blended with other sprouts for salads, wraps, and sandwiches.
| Flavor: Bitter |
| Difficulty: Moderate to Difficult |
| Seed Amount: 3 tablespoons per 1 quart mason jar |
| Yield: 3 – 4 cups |
| Soak: 4 – 8 hours |
| Rinse: 2 – 3 times per day |
| Ready: In 5 – 9 days |
| Seed Viability: Approx. 5 years in optimal conditions (70˚F with 70% humidity or less) |
Find organic fenugreek sprouting seeds here
Green lentils have a hint of peppery flavor, while red and blue (French) lentils are more mild. Use them to make sprouted lentil salad.
| Flavor: Varies |
| Difficulty: Easy |
| Seed Amount: 1/2 cup in 1 quart mason jar |
| Yield: 3 cups |
| Soak: 4-8 hours |
| Rinse: 2-3 times per day |
| Ready: In 3-4 days |
| Seed Viability: Approx. 5 years in optimal conditions (70˚F with 70% humidity or less) |
Find organic red lentil sprouting seeds here
Find organic green lentil sprouting seeds here
Find organic French lentil sprouting seeds here
Crisp and crunchy, mung beans have a flavor similar to peas that works well in stir fry’s, wraps, sandwiches, salad and soups. Mung beans contain beta-carotene, B vitamins, vitamin C and vitamin E, as well as folate and fiber.
| Flavor: Similar to crisp, crunchy garden peas |
| Difficulty: Easy |
| Seed Amount: 1/4 cup |
| Yield: 2-3 cups |
| Soak: 4 hours |
| Rinse: 2-3 times per day |
| Ready: In 3-4 days |
| Seed Viability: Approx. 5 years in optimal conditions (70˚F with 70% humidity or less) |
Find organic mung bean sprouting seeds here
Onion sprouts make a tasty addition to food in just about any situation you would use regular onion.
| Flavor: Like onion, but milder |
| Difficulty: Easy |
| Seed Amount: 2 tablespoons in 1 quart jar |
| Yield: 3-4 cups |
| Soak: 6-8 hours |
| Rinse: 2-3 times per day |
| Ready: In 4-8 days |
| Seed Viability: Approx. 1 year in optimal conditions (70˚F with 70% humidity or less) |
Find onion sprouting seeds here
| Flavor: Spicy |
| Difficulty: Easy |
| Seed Amount: 2 tablespoons in 1 quart jar |
| Yield: 3-4 cups |
| Soak: 6-8 hours |
| Rinse: 2-3 times per day |
| Ready: In 4-6 days |
| Seed Viability: Approximately 5 years in optimal conditions (70F with 70% humidity or less) |
Find daikon radish sprouting seeds here
Red quinoa is slightly more bitter and crunchy than white quinoa, but the lighter seed is out of stock right now. It can be used in soups, salads, wraps and sandwiches.
| Flavor: Nutty and slightly bitter |
| Difficulty: Easy |
| Seed Amount: 2 tablespoons in 1 quart jar |
| Yield: 3-4 cups |
| Soak: 30 minutes |
| Rinse: 2-3 times per day |
| Ready: In 1-2 days |
| Seed Viability: Approximately 5 years in optimal conditions (70F with 70% humidity or less) |
Find organic red quinoa sprouting seeds here
Chia, flax and other seeds that form a mucilaginous (gel-like) texture when moistened can be sprouted, but they tend to mold when you use the jar method for sprouting. Since I like to keep things as easy as possible, I use them in other recipes like:
Strawberry chia seed jam
Coconut strawberry chia seed pudding
Blackberry chia seed jam
Elderberry and strawberry jam
Flaxseed hair detangler
Flaxseed hair gel
White quinoa is less bitter and crunchy than red quinoa, but it’s out of stock at the place I buy from right now. My main reason for not including it, though, is that it has a low germination rate. In other words, a lot of the seeds fail to sprout. For that reason, I opt for other seeds that have a better success rate.
What’s the difference between sprouts and microgreens?They’re similar to sprouts but grown in shallow trays of soil.
Sources: